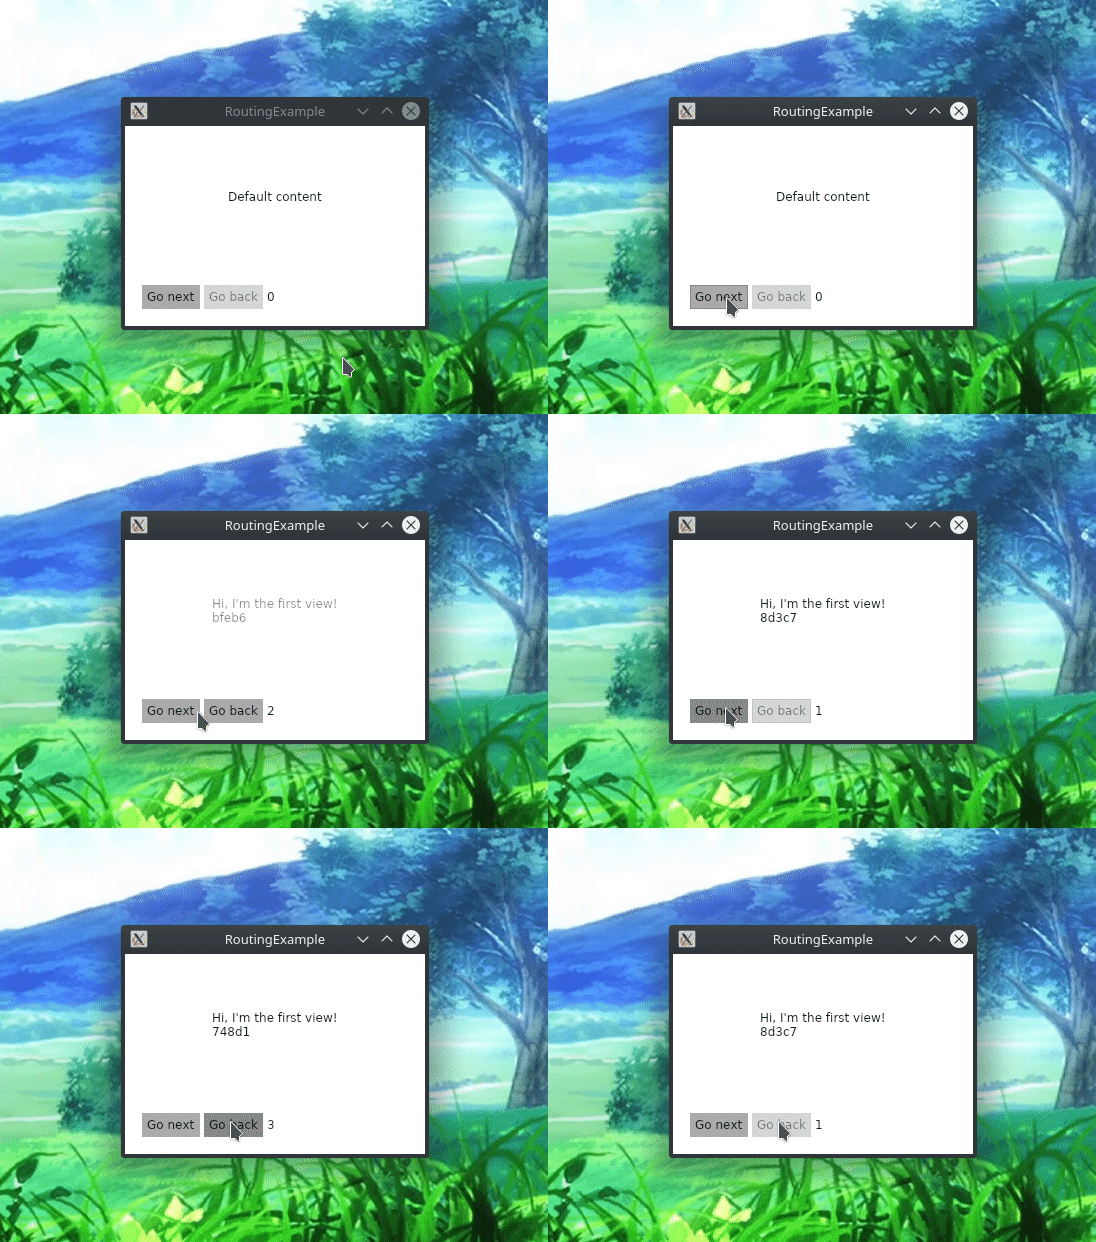
Routing
ReactiveUI routing consists of an IScreen that contains current RoutingState, several IRoutableViewModels, and a platform-specific XAML control called RoutedViewHost. RoutingState manages the view model navigation stack and allows view models to navigate to other view models. IScreen is the root of a navigation stack; despite the name, its views don't have to occupy the whole screen. RoutedViewHost monitors an instance of RoutingState, responding to any changes in the navigation stack by creating and embedding the appropriate view.
Routing Example
Create a new empty project from Avalonia templates. To use those, clone the avalonia-dotnet-templates repository, install the templates and create a new project named RoutingExample based on avalonia.app template. Install Avalonia.ReactiveUI package into the project.
git clone https://github.com/AvaloniaUI/avalonia-dotnet-templates
dotnet new --install ./avalonia-dotnet-templates
dotnet new avalonia.app -o RoutingExample
cd ./RoutingExample
dotnet add package Avalonia.ReactiveUI
FirstViewModel.cs
First, create routable view models and corresponding views. We derive routable view models from the IRoutableViewModel interface from ReactiveUI namespace, and from ReactiveObject as well. ReactiveObject is the base class for view model classes, and it implements INotifyPropertyChanged.
namespace RoutingExample
{
    public class FirstViewModel : ReactiveObject, IRoutableViewModel
    {
        // Reference to IScreen that owns the routable view model.
        public IScreen HostScreen { get; }

        // Unique identifier for the routable view model.
        public string UrlPathSegment { get; } = Guid.NewGuid().ToString().Substring(0, 5);

        public FirstViewModel(IScreen screen) => HostScreen = screen;
    }
}
FirstView.xaml
<UserControl xmlns="https://github.com/avaloniaui"
             xmlns:x="http://schemas.microsoft.com/winfx/2006/xaml"
             x:Class="RoutingExample.FirstView">
    <StackPanel HorizontalAlignment="Center"
                VerticalAlignment="Center">
        <TextBlock Text="Hi, I'm the first view!" />
        <TextBlock Text="{Binding UrlPathSegment}" />
    </StackPanel>
</UserControl>
FirstView.xaml.cs
If we need to handle view model activation and deactivation, then we add a call to WhenActivated to the view. Generally, a rule of thumb is to always add WhenActivated to your views, see Activation docs for more info.
namespace RoutingExample
{
    public class FirstView : ReactiveUserControl<FirstViewModel>
    {
        public FirstView()
        {
            this.WhenActivated(disposables => { });
            AvaloniaXamlLoader.Load(this);
        }
    }
}
MainWindowViewModel.cs
Then, create a view model implementing the IScreen interface. It contains current RoutingState that manages the navigation stack. RoutingState also contains helper commands allowing you to navigate back and forward.
Actually, you can use as many IScreens as you need in your application. Despite the name, it doesn't have to occupy the whole screen. You can use nested routing, place IScreens side-by-side, etc.
namespace RoutingExample
{
    public class MainWindowViewModel : ReactiveObject, IScreen
    {
        // The Router associated with this Screen.
        // Required by the IScreen interface.
        public RoutingState Router { get; } = new RoutingState();

        // The command that navigates a user to first view model.
        public ReactiveCommand<Unit, IRoutableViewModel> GoNext { get; }

        // The command that navigates a user back.
        public ReactiveCommand<Unit, IRoutableViewModel> GoBack => Router.NavigateBack;

        public MainWindowViewModel()
        {
            // Manage the routing state. Use the Router.Navigate.Execute
            // command to navigate to different view models.
            //
            // Note, that the Navigate.Execute method accepts an instance
            // of a view model, this allows you to pass parameters to
            // your view models, or to reuse existing view models.
            //
            GoNext = ReactiveCommand.CreateFromObservable(
                () => Router.Navigate.Execute(new FirstViewModel(this))
            );
        }
    }
}
MainWindow.xaml
Now we need to place the RoutedViewHost XAML control to our main view. It will resolve and embed appropriate views for the view models based on the supplied IViewLocator implementation and the passed Router instance of type RoutingState. Note, that you need to import rxui namespace for RoutedViewHost to work. Additionally, you can override animations that are played when RoutedViewHost changes a view — simply override RoutedViewHost.PageTransition property in XAML. For latest builds from MyGet use xmlns:rxui="https://reactiveui.net", for 0.8.0 release on NuGet use xmlns:rxui="clr-namespace:Avalonia;assembly=Avalonia.ReactiveUI" as in the example below.
<Window xmlns="https://github.com/avaloniaui"
        xmlns:rxui="clr-namespace:Avalonia.ReactiveUI;assembly=Avalonia.ReactiveUI"
        xmlns:app="clr-namespace:RoutingExample"
        xmlns:x="http://schemas.microsoft.com/winfx/2006/xaml"
        xmlns:d="http://schemas.microsoft.com/expression/blend/2008"
        xmlns:mc="http://schemas.openxmlformats.org/markup-compatibility/2006"
        mc:Ignorable="d" d:DesignWidth="800" d:DesignHeight="450"
        x:Class="RoutingExample.MainWindow"
        Title="RoutingExample">
    <Grid>
        <Grid.RowDefinitions>
            <RowDefinition Height="*" />
            <RowDefinition Height="Auto" />
        </Grid.RowDefinitions>
        <rxui:RoutedViewHost Grid.Row="0" Router="{Binding Router}">
            <rxui:RoutedViewHost.DefaultContent>
                <TextBlock Text="Default content"
                           HorizontalAlignment="Center"
                           VerticalAlignment="Center" />
            </rxui:RoutedViewHost.DefaultContent>
            <rxui:RoutedViewHost.ViewLocator>
                <!-- See AppViewLocator.cs section below -->
                <app:AppViewLocator />
            </rxui:RoutedViewHost.ViewLocator>
        </rxui:RoutedViewHost>
        <StackPanel Grid.Row="1" Orientation="Horizontal" Margin="15">
            <StackPanel.Styles>
                <Style Selector="StackPanel > :is(Control)">
                    <Setter Property="Margin" Value="2"/>
                </Style>
                <Style Selector="StackPanel > TextBlock">
                    <Setter Property="VerticalAlignment" Value="Center"/>
                </Style>
            </StackPanel.Styles>
            <Button Content="Go next" Command="{Binding GoNext}" />
            <Button Content="Go back" Command="{Binding GoBack}" />
            <TextBlock Text="{Binding Router.NavigationStack.Count}" />
        </StackPanel>
    </Grid>
</Window>
To disable the animations, simply set the RoutedViewHost.PageTransition property to {x:Null}, like so:
<rxui:RoutedViewHost Grid.Row="0" Router="{Binding Router}" PageTransition="{x:Null}">
    <rxui:RoutedViewHost.DefaultContent>
        <TextBlock Text="Default content"
                   HorizontalAlignment="Center"
                   VerticalAlignment="Center" />
    </rxui:RoutedViewHost.DefaultContent>
</rxui:RoutedViewHost>
AppViewLocator.cs
The AppViewLocator that we are passing to the RoutedViewHost control declared in the MainWindow.xaml markup shown above is responsible for resolving a View based on the type of the ViewModel. The IScreen.Router instance of type RoutingState determines which ViewModel should be currently shown. See View Location for details. The simplest possible IViewLocator implementation based on pattern matching might look like this:
namespace RoutingExample
{
    public class AppViewLocator : ReactiveUI.IViewLocator
    {
        public IViewFor ResolveView<T>(T viewModel, string contract = null) => viewModel switch
        {
            FirstViewModel context => new FirstView { DataContext = context },
            _ => throw new ArgumentOutOfRangeException(nameof(viewModel))
        };
    }
}
MainWindow.xaml.cs
Here is the code-behind for MainWindow.xaml declared above.
namespace RoutingExample
{
    public class MainWindow : ReactiveWindow<MainWindowViewModel>
    {
        public MainWindow()
        {
            this.WhenActivated(disposables => { });
            AvaloniaXamlLoader.Load(this);
        }
    }
}
App.axaml.cs
Make sure you initialize the DataContext of your root view in App.axaml.cs
public override void OnFrameworkInitializationCompleted()
{
    if (ApplicationLifetime is IClassicDesktopStyleApplicationLifetime desktop)
    {
        desktop.MainWindow = new MainWindow
        {
            DataContext = new MainWindowViewModel(),
        };
    }

    base.OnFrameworkInitializationCompleted();
}
Finally, add .UseReactiveUI() to your AppBuilder:
namespace RoutingExample
{
    public static class Program
    {
        public static void Main(string[] args)
        {
            BuildAvaloniaApp().StartWithClassicDesktopLifetime(args);
        }

        public static AppBuilder BuildAvaloniaApp() =>
            AppBuilder.Configure<App>()
                .UseReactiveUI()
                .UsePlatformDetect()
                .LogToDebug();
    }
}
Now, you can run the app and see routing in action!
dotnet run --framework netcoreapp2.1
